4. Notice of Intent [NoI]

IMPORTANT:- Some links in this article will only be accessible to authorised Members that have logged into the Exchange Trade Centre

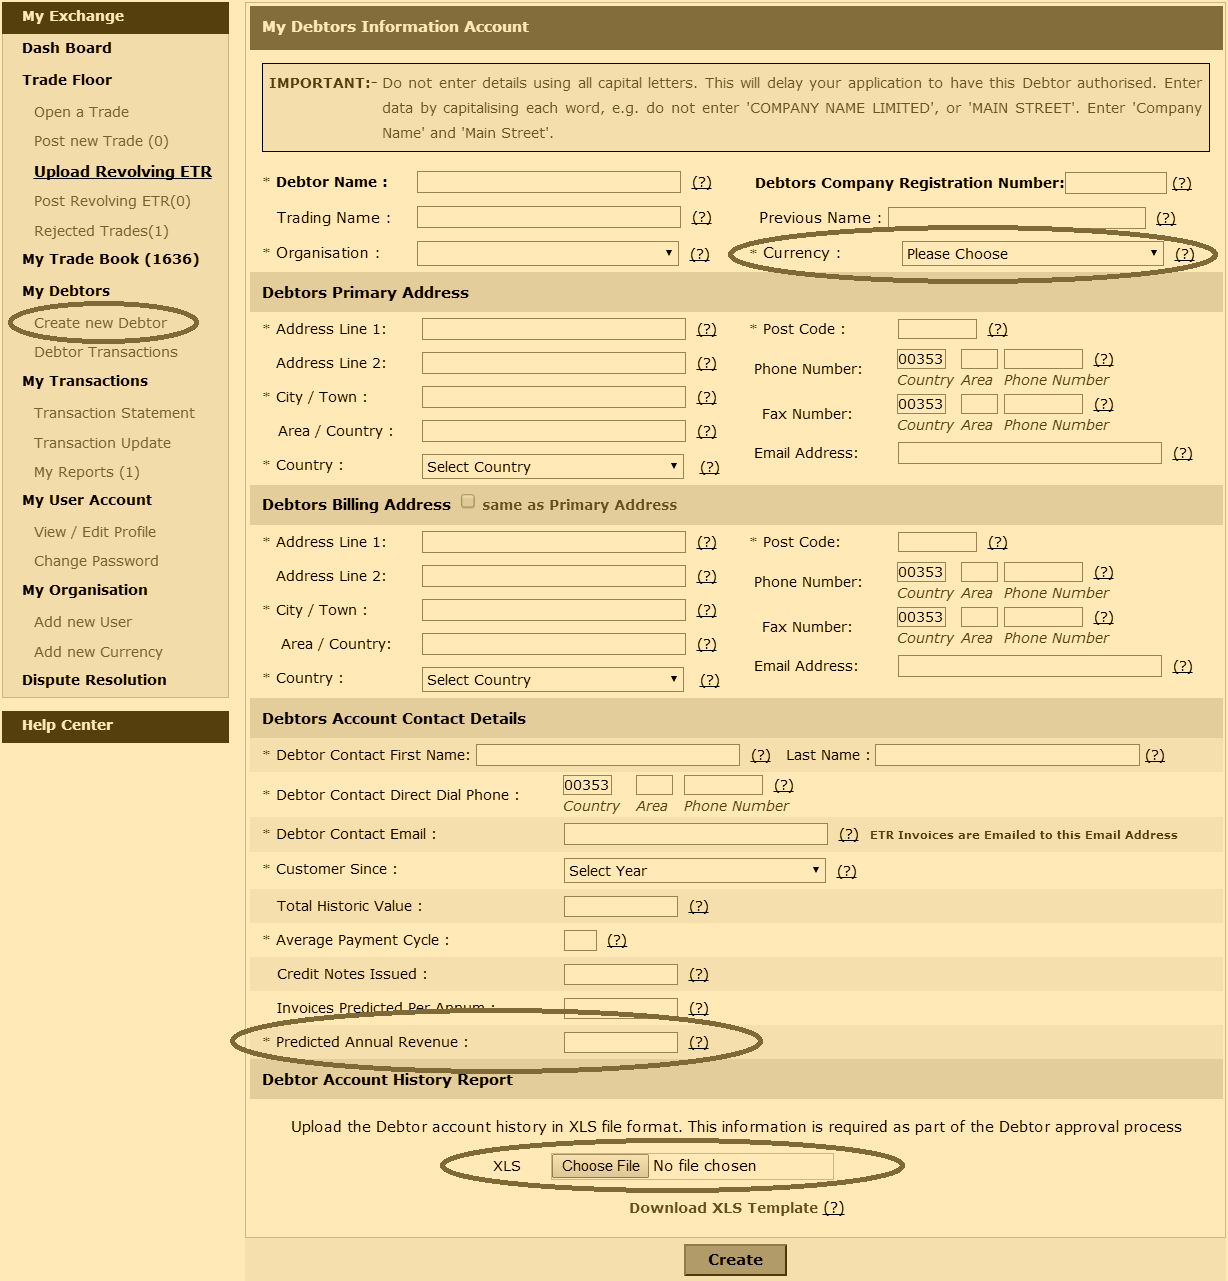
All Debtors that are submitted using the ‘Create new Debtor‘ menu item are subject to approval by the Credebt Exchange® Back Office. IMPORTANT NOTE:-Originators should allow 72-hours for every Debtor approval to occur.

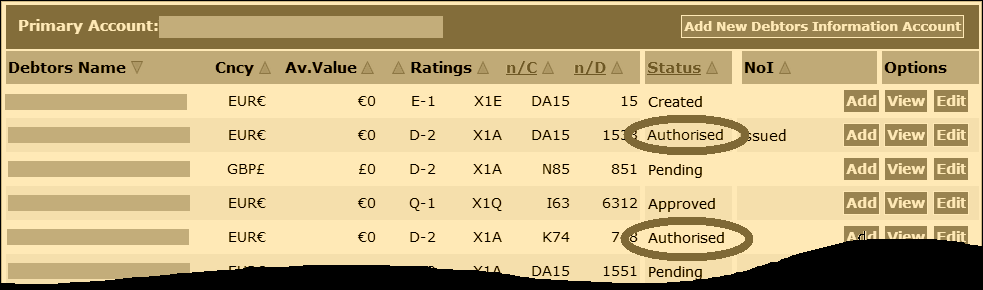
At the same time, the Originator must issue a Notice of Intent [NoI] to each new Debtor created. The NoI is a courtesy letter to the Debtor to advise them that you will be selling invoices, payable by them, to Credebt Exchange®. 

The Sample NoI can be copied and modified (i.e. the text can be substantially changed) before being pasted onto the Originator’s own letterhead.  However the Originator chooses to modify the Sample NoI, the Notice of Assignment [NoA], that is shown as the last page of the NoI, should not be altered.

The Notice of Assignment [NoA] is a separate document and although it must be included with the NoI, it should not be confused with it. The NoI and NoA are two separate documents. Where the Originator is permitted to modify the NoI as explained in the previous paragraph, the NoA should only be amended to show the Originator’s name and the date that they became a Member of Credebt Exchange®. No other changes should occur on the NoA.


Viewing the Currency Accounts

5. Upload Revolving ETR

IMPORTANT:- Some links in this article will only be accessible to authorised Members that have logged into the Exchange Trade Centre

Invoices submitted using the Upload Revolving ETR interface must be in PDF format only. Depending on your accounting system, it should be possible to export invoices into PDF format and users of the latest versions of Microsoft Office® can save documents to PDF format. If your accounting system cannot produce PDF documents, ask your IT administrator to supply you with PDF generating software.

IMPORTANT:- Submit only one single invoice at a time using the Upload Revolving ETR interface. If you need to split PDF ‘spools’ of invoices into separate PDFs for each invoice, we suggest (but do not recommend) using PDF Split & Merge.

As explained in the previous article, you must Open a Trade before you can proceed to this step and Upload Revolving ETR. Login to the Exchange Trade Centre | Dash Board and use the Upload Revolving ETR menu item from the left side menu. All mandatory fields on this form are marked with an asterisk * and three fields require special attention:

  • Face Value
  • Expected Date
  • Attach Invoice

 
The Face Value must exactly match the total value shown on the invoice that is attached to this form and submitted to the Exchange. The Expected Date is a ‘best estimate’ of the date that the invoice will be Settled by the Debtor. The date entered here is important because it affects how the Reserve is calculated and how the Collections Policy is monitored.

IMPORTANT:- Before using the Save or Submit buttons on this form, read the ETR Save, Submit & Send article.

Attach Invoice

As stated, copies of the invoices submitted using the Upload Revolving ETR interface must be in PDF format only. If, for whatever reason, your invoices contain any text or markings relating to Credebt Exchange, remove them before uploading the invoice to the system using the ‘Choose File’ button.


My Debtors interface

Use the Upload Revolving ETR form to upload each invoice to the Exchange Trade Floor. Once this Revolving ETR Invoice Upload form is submitted, you have successfully completed all of the steps required to Trade and sell your ETR on Credebt Exchange®.

Move to the Next Step: ETR Save, Submit & Send >>>

4. Open a Trade

IMPORTANT:- Some links in this article will only be accessible to authorised Members that have logged into the Exchange Trade Centre

As explained in the previous article: 3. Create new Debtor, you must have at least one authorised Debtor on the system before you can proceed to this step and Open a Trade. Before being able to sell any invoices on the Exchange, Originators must first commit to sell all invoices/ETR to specified Debtors over a certain period of time (typically 12 months). This commitment is documented using the Open a Trade menu item from the left side menu of the Exchange Trade Centre | Dash Board.

The Open a Trade interface requires that the Debtor is selected, the Payment Terms are entered and that the Originator commitment to sell all the ETR to that Debtor are specified in these three fields:

  • Total Face Value of ETR (the Revolving ETR Limit)
  • Number of ETR
  • Revolving Offer Months (the Revolving ETR Period)

 
The Originator uses their ‘best estimate’ when entering the data in these three fields. When the Debtor is selected from the drop-down dialog, the system automatically populates the ‘Total Face Value of ETR’ field using the figure entered in the ‘Predicted Annual Revenue’ field on the Add new Debtor interface.

Using the same ‘best estimate’, the Originator enters the number of ETR they will issue over the Revolving Offer Months. The Revolving Offer Months is typically 12 months as seen in the screenshot below. In this example, the Originator is committing to sell 24 ETR with a total Face Value of 120,000 over a Revolving Offer Months period of 12 months. The form is then submitted to the Exchange so that actual trading in specific ETR can commence.

IMPORTANT:- Each Debtor requires a single Open a Trade for the Revolving Offer Months period. In this example, once this Open a Trade is submitted, another submission is not needed until the first 12 month period has expired.


Open a Trade interface

IMPORTANT:- Allow 24 hours for the Exchange Back Office to authorise each Revolving ETR trade.

Move to the Next Step: 5. Upload Revolving ETR >>>

3. Create new Debtor

IMPORTANT:- Some links in this article will only be accessible to authorised Members that have logged into the Exchange Trade Centre

If there is more than one user on your Originator account, it is possible that these other users have added Debtors to the account. Before using the ‘Create new Debtor’ menu item, you should check the list of Debtors enabled on the account. To do this, simply login to the Exchange Trade Centre | Dash Board and select the My Debtors menu item from the left side menu. If there are no Debtors listed on this interface, use the instructions below and Create new Debtor and note that all Debtors must have Status ‘Authorised’ before any invoices/ETR can be traded and sold on the Exchange.


My Debtors interface

As explained in the previous article: 2. Add new Currency, if you are going to sell invoices/ETR in more than your base currency, you must first use the ‘Add new Currency’ menu item. Once the currency is added, you can enter your Debtors. Login to the Exchange Trade Centre | Dash Board and select the Create new Debtor menu item from the left side menu.


Adding a new Debtor

The Add new Debtor interface provides you with a drop down list of available currencies (if you need to add another currency re-read article 2. Add new Currency). Enter all the Debtor details on this form and note that mandatory fields are marked with an asterisk *.

Before submitting the form, you should also attach the ‘Debtor Experience’. Depending on your accounting system and the terminology you use, Debtor Experience is also referred to as the trading history, or Debtor statement, or customer transactions report, amongst other names. Export the Debtor Experience from your accounting system and copy the data into the debtor_template.xls. The Exchange system will accept correctly entered data in this specific format in .XLS format only. With the form completed and the correctly formatted debtor_template.xls attached, submit the form for processing by the Exchange Back Office.

Note:-If the form will not accept the debtor_template.xls, check that the file is saved as in .XLS format and that you have entered all the data in the format prescribed. Then try uploading it again

IMPORTANT:- Allow 72 hours for the Exchange Back Office to enable the Debtor application Status to ‘Authorised’.

Move to the Next Step: 4. Open a Trade >>>

2. Add new Currency

IMPORTANT:- Some links in this article will only be accessible to authorised Members that have logged into the Exchange Trade Centre

As explained in the previous article: 1. Base Currency, the country of registration determines the base currency that the Originator trades in. To add another currency, the Originator logs into the Exchange Trade Centre | Dash Board and selects the Add new Currency menu item from the left side menu.


Adding a new Currency Account

The Add new Currency interface provides you with a drop down list of countries and their corresponding currency. The first three entries on this list are:

  • Europe – EUR €
  • UK – GBP £
  • USA – USD $

 
Once you have selected the Country & Currency you wish to trade in, you must select the Bank Account that you will use to receive Purchase Payments and Reserve Payments.

IMPORTANT:- before deciding what bank account to use for receiving payments, carefully read about and understand Trading in Multiple Currencies


Entering the new currency bank account

With a clear understanding of the implications of Trading in Multiple Currencies, you can choose the ‘Use Existing Bank Account Yes’ radio button or the ‘Add new Bank Account’ radio button. If you use the ‘Add new Bank Account’ radio button, you must enter new bank account details for a bank account that can receive foreign currencies (consult your bank for further details on how to do this).

Move to the Next Step: 3. Add new Debtor >>>

1. Base Currency

IMPORTANT:- Some links in this article will only be accessible to authorised Members that have logged into the Exchange Trade Centre

To become an Originator on Credebt Exchange®, the Originator enters their organisation details, contact information and other data about their operations. As part of this setup process, the Originator enters the organisation details and selects the country of registration (i.e. the country where the organisation is registered). The country of registration determines the base currency that the Originator trades in.


Viewing the Currency Accounts

To check the Originator base currency, login to the Exchange Trade Centre | Dash Board and select the My Organisation menu item from the left side menu. The first line entry on this interface is the Originator base currency and in the above screenshot, this Originator’s base currency is EUR €, or Euro.

Move to the Next Step: 2. Add new Currency >>>